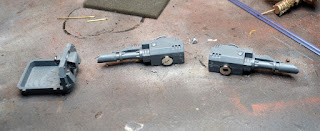
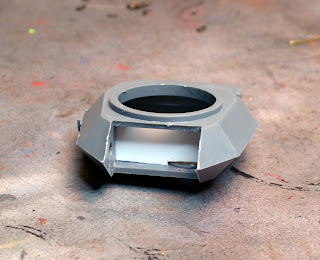
I needed to build a Predator for my Dark Angel army and figured I'd put in the extra time to magnetize it. And since I'm putting in the extra time to do that I might as well take some pictures and make a how to. So here it is. If you have ever thought about magnetizing a vehicle it's a good idea and can save you some money in the long run. If you go for what you see is what you get then it will allow you to load the tank out with whatever you like instead of buying two and building both (standard) builds. That's costly and most likely you'd be running one build more then another, so the other tank would just sit. Plus who knows, maybe one day you'll play a friendly game and want HBs but the next day you'll be playing a Tourney and want LAS. Plus a weapon might get blown off during a game, now you can remove it. It can all be yours and MORE! with the magical power of magnets.... haha.. sorry was getting in the groove and felt like I was selling a new car or something.. so lets move on to the How To
Super Glue
Files/Seam Scraper
Magnets - I get mine from K&J Magnets but many places sell them. Below are the ones I use the most.
D201-N52 .. 1/8 x 1/32 .. is the size I use for Backpacks
D41-N52 .. 1/4 x 1/16 .. Vehicle Bases/Flying Bases
D21 .. 1/8 x 1/16 .. Deep uses (heavy metal packs or mini to bases)
Some plastic card (not very much)
** A little note I want to mention before we start. Let the glue on the magnets dry for a few hours after applying, these magnets are very strong and if you don't let it form a very strong bond they will just pop off to stay with their buddy on the other piece**
Magnetizing the Predator Sponsons:
The Sponsons are a pretty simple affair. Build up the tank to the point of attaching the side doors/sponsons.
1) Glue the top plate of the sponson to the door as normal
2) Glue the guns together (HBs and Las and the Turret guns as well) DO NOT USE THE CENTER PIN as you normally would. Leave that piece out.
3) Now for the center pins, cut below the combined circle and square piece. See the diagram below.
4) Once the pins are cut you can attach the targeter and magnet. INSERT THE PIN INTO THE SPONSON PLATE BEFORE ATTACHING, THE DIAGRAM BELOW ONLY SHOWS POSITION if you don't you'll have Shockwave's head on a stick. Which isn't too useful in this instance.
Once this section is done it should look like this
Be careful with the amount of glue or the targeter will not rotate. The guns will still pivot regardless though, they will spin at the magnet bond.
5) Now it's time for the guns. I went with a larger Magnet more for the look then for strength so you should be able to use the same sizes. Up to you. Just glue the magnet over the slot on top of the guns. Make sure you have the correct facing on the magnets. I use a sharpie to mark them before gluing.
6) That's it, the Sponsons are done!
Magnetize the Predator Turret:
1) You are going to glue the turret together without placing the weapon into it. But not yet.
2) First you'll need to cut out the brace that you'll glue the magnets to. I just cut a piece of Plasticard,
1" x 3/8". You'll need to trim the top of the side with the screen/port/whatever it is on it.
3) Once you cut out the piece and trim the top to fit, you'll then glue the Plasticard to the inside where the gun slides in. There is a flat section on each side it will attach to. (the pic below shows the turret upside down so you can see the trimmed section)
4) When the turret is secure glue your magnets on. I glued them on the back side of the card so the magnets on the gun section would sit flush and not stick out too far. (below you are seeing the magnets on the outside but they are just magnetically attached to the ones that are on the inside. they are just ready to be glued)
5) Now you are going to trim the pegs off the side of the gun sections. File it down so it's smooth and slides into the housing easily.
6) Apply Glue to the magnets on the outside of the card. Be careful not to put too much glue on them and accidental glue the magnets to the Pcard. Let the glue dry completely, I left them for about 8 hours (overnight) for a good bond.
7) Once I can safely remove the gun section I'll apply a generous amount of glue to the back and side section of the magnets to make sure they have a very good bond. Try to keep the glue off the outside of the magnet, you want a smooth connection.
8) You're Done.. you now have a magnetized Predator.
I hope this is helpful, and this is only a how I did it. I'm sure there plenty of ways to do the same thing. Also don't blame me if you cut something and are having problems getting it to work haha .. It's a pretty easy build just don't rush it! Take your time and let the glue do it's stuff.


No comments:
Post a Comment